آموزش اسمبل کردن کیت پرینتر سه بعدی
آموزش اسمبل کردن کیت پرینتر سه بعدی
آموزش قسمت الکترونیکی:
Electronics and wiring
A. Mounting electronics
لوازم مورد نیاز این قسمت: کانال ما در تلگرام
•RAMPS شیلد
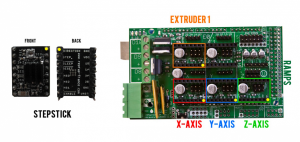
•Atmega 2650 برد آردینو ۲۵۶۰
•۴x stepsticks درایور استپ موتور ۴عدد
Mount the RAMPS on the Arduino Atmega 2560. You may have to cut the welds located below the RAMPS power supply plug. You should have both power supply plugs on the same side
Plug each stepstick on the RAMPS according to the illustration below. One location still free to plug a dual extruder for example.
Fix the electronics assembly at aluminium plate rear with three Arduino washers used to electrically insulate. Power supply plugs are oriented downward. Use three M3x30 mm screws (head on the front), three Ø۳ mm washers (on the RAMPS) and three M3 nuts.
B. Wiring
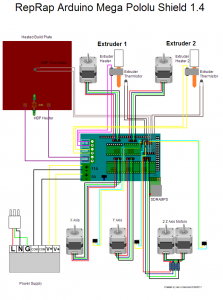
All electrical connections are summarized on this scheme:
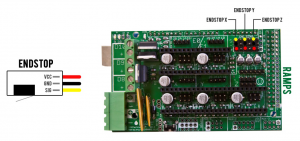
Endstop wiring
Plug the three endstops to the RAMPS with three connecting wires (wires with an « Endstop » mark) according to the following wiring scheme:
۲.Motors wiring
You have to connect both Z-axis NEMA 17 motors to work in parallel. To do that, weld both power supply wires (cut in a previous step) according to their colors : red/red, green/green, blue/blue and black/black. We strongly recommend you to protect each weld with heat shrink tubing or an insulating adhesive tape.
NEMA 17 wires color can change depending on the supplier and there is no risk in case of a wrong wiring. Indeed, the wires are always associated in pairs (one pair for each coil). SO there is no risk if the color of supply wires doesn’t match the wiring diagram.
۳.Resistor and PCB heatbed wiring
The resistor is not polarized and is pluged to D10.
PCB heatbed is pluged to D08. Make sure to not invert the positive and negative poles.
۴.Thermistors wiring
The thermistor is not polarized. Make sure to not invert the PCB heatbed thermistor and the Extruder thermistor.
۵.Fans wiring
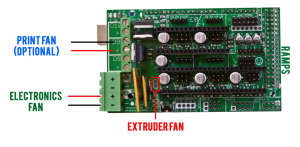
Plug the extruder fan directly to his dedicated power supply pins (see illustration below).
If you have a fan which is cooling the electronics, plug it directly to the RAMPS.
If you have a fan which is cooling the print, plug it to
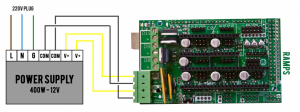
۶.Power supply wiring
The principle power supply wire is not included. You have to strip an end of a power cable and to connect to the power supply (L, N, G plugs). Make sure to do this operation properly.
 +
+
The power supply is connected to the RAMPS with additional connecting wires. You have to strip both ends, make sure to follow the scheme correctly.