ساخت نویسنده با سی دی رام
ساخت نویسنده با سی دی رام
ساخت نویسنده با سی دی رام
درباره این پروژه
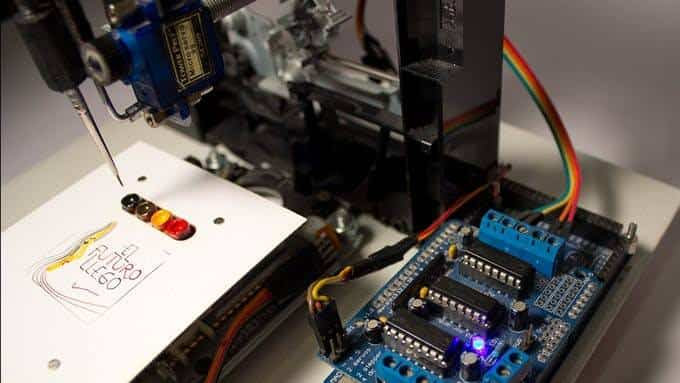
PENXZYL یک پروژه هنری الکترونیکی است. این پلاتر است که قابلیت نقاشی روی کاغذ را دارد د. این یک نسخه بهبود یافته از پلاتر قبلی قلم ۲ محور هستش.
در میان پیشرفت های دیگر، محور Z را اضافه کردم و به جای استفاده از فیبر، از ظروف برس و روغن استفاده می کنم. این دستگاه با دو موتور سی دی رام DVD بازیافتی، یک سروو، آردوینو مگا ۲۵۶۰ و یک موتور محافظ Adafruit ساخته شده است. از یک رایانه، داده های نقاشی در G-Code ارسال می شود که توسط تخته ها تفسیر شده است، موتورها را بر اساس مختصات حرکت می دهد و نقاشی ها را تولید می کند.
این هم از نقشه الکترونیکی :

کد های زیر را کپی و در برد آردو ینو خود آپلود کنید
/*
 Mini CNC Brush Plotter firmware, based in TinyCNC https://github.com/MakerBlock/TinyCNC-Sketches
 Send GCODE to this Sketch using gctrl.pde https://github.com/damellis/gctrl
 Convert SVG to GCODE with MakerBot Unicorn plugin for Inkscape available here https://github.com/martymcguire/inkscape-unicorn
 More information about the Mini CNC Plotter here (german, sorry): http://www.makerblog.at/2015/02/projekt-mini-cnc-plotter-aus-alten-cddvd-laufwerken/
  */

#include <Servo.h>
#include <AFMotor.h>

#define LINE_BUFFER_LENGTH 512


char STEP = MICROSTEP ;


// Servo position for Up and Down
const int penZUp = ۱۵;
const int penZDown = ۱۲۰;

// Servo on PWM pin 10
const int penServoPin = ۱۰;

// Should be right for DVD steppers, but is not too important here
const int stepsPerRevolution = ۲۰;

// create servo object to control a servo
Servo penServo;

// Initialize steppers for X- and Y-axis using this Arduino pins for the L293D H-bridge
AF_Stepper myStepperY(stepsPerRevolution,۱);
AF_Stepper myStepperX(stepsPerRevolution,۲);

/* Structures, global variables    */
struct point {
  float x;
  float y;
  float z;
};

// Current position of plothead
struct point actuatorPos;

//  Drawing settings, should be OK
float StepInc = ۰;
int StepDelay = ۱;  //
int LineDelay = ۱;  //
int penDelay = ۵۰;  //

// Motor steps to go 1 millimeter.
// Use test sketch to go 100 steps. Measure the length of line.
// Calculate steps per mm. Enter here.
float StepsPerMillimeterX = ۱۰۰.۰; //
float StepsPerMillimeterY = ۱۰۰.۰; //

// Drawing robot limits, in mm
// OK to start with. Could go up to 50 mm if calibrated well.
float Xmin = ۰;
float Xmax = ۴۰;
float Ymin = ۰;
float Ymax = ۴۰;
float Zmin = ۰;
float Zmax = ۱;

float Xpos = Xmin;
float Ypos = Ymin;
float Zpos = Zmax;

// Set to true to get debug output.
boolean verbose = false;

//  Needs to interpret
//  G1 for moving
//  G4 P300 (wait 150ms)
//  M300 S30 (pen down)
//  M300 S50 (pen up)
//  Discard anything with a (
//  Discard any other command!

/**********************
 * void setup() - Initialisations
 ***********************/
void setup() {
  //  Setup

  Serial.begin( ۹۶۰۰ );

  penServo.attach(penServoPin);
  penServo.write(penZUp);
  delay(۱۰۰);

  // Decrease if necessary
  myStepperX.setSpeed(۵۰۰);  //

  myStepperY.setSpeed(۵۰۰);  //


  //  Set & move to initial default position
  // TBD

  //  Notifications!!!
  Serial.println("Mini CNC Plotter alive and kicking!");
  Serial.print("X range is from ");
  Serial.print(Xmin);
  Serial.print(" to ");
  Serial.print(Xmax);
  Serial.println(" mm.");
  Serial.print("Y range is from ");
  Serial.print(Ymin);
  Serial.print(" to ");
  Serial.print(Ymax);
  Serial.println(" mm.");
}

/**********************
 * void loop() - Main loop
 ***********************/
void loop()
{

  delay(۵۰);
  char line[ LINE_BUFFER_LENGTH ];
  char c;
  int lineIndex;
  bool lineIsComment, lineSemiColon;

  lineIndex = ۰;
  lineSemiColon = false;
  lineIsComment = false;

  while (۱) {

    // Serial reception - Mostly from Grbl, added semicolon support
    while ( Serial.available()>۰ ) {
      c = Serial.read();
      if (( c == '\n') || (c == '\r') ) {             // End of line reached
        if ( lineIndex > ۰ ) {                        // Line is complete. Then execute!
          line[ lineIndex ] = '\۰';                   // Terminate string
          if (verbose) {
            Serial.print( "Received : ");
            Serial.println( line );
          }
          processIncomingLine( line, lineIndex );
          lineIndex = ۰;
        }
        else {
          // Empty or comment line. Skip block.
        }
        lineIsComment = false;
        lineSemiColon = false;
        Serial.println("ok");
      }
      else {
        if ( (lineIsComment) || (lineSemiColon) ) {   // Throw away all comment characters
          if ( c == ')' )  lineIsComment = false;     // End of comment. Resume line.
        }
        else {
          if ( c <= ' ' ) {                           // Throw away whitepace and control characters
          }
          else if ( c == '/' ) {                    // Block delete not supported. Ignore character.
          }
          else if ( c == '(' ) {                    // Enable comments flag and ignore all characters until ')' or EOL.
            lineIsComment = true;
          }
          else if ( c == ';' ) {
            lineSemiColon = true;
          }
          else if ( lineIndex >= LINE_BUFFER_LENGTH-۱ ) {
            Serial.println( "ERROR - lineBuffer overflow" );
            lineIsComment = false;
            lineSemiColon = false;
          }
          else if ( c >= 'a' && c <= 'z' ) {        // Upcase lowercase
            line[ lineIndex++ ] = c-'a'+'A';
          }
          else {
            line[ lineIndex++ ] = c;
          }
        }
      }
    }
  }
}

void processIncomingLine( char* line, int charNB ) {
  int currentIndex = ۰;
  char buffer[ ۶۴ ];                                 // Hope that 64 is enough for 1 parameter
  struct point newPos;

  newPos.x = ۰.۰;
  newPos.y = ۰.۰;

  //  Needs to interpret
  //  G1 for moving
  //  G4 P300 (wait 150ms)
  //  G1 X60 Y30
  //  G1 X30 Y50
  //  M300 S30 (pen down)
  //  M300 S50 (pen up)
  //  Discard anything with a (
  //  Discard any other command!

  while( currentIndex < charNB ) {
    switch ( line[ currentIndex++ ] ) {              // Select command, if any
    case 'U':
      penUp();
      break;
    case 'D':
      penDown();
      break;
    case 'G':
      buffer[۰] = line[ currentIndex++ ];          // /!\ Dirty - Only works with 2 digit commands
      //      buffer[1] = line[ currentIndex++ ];
      //      buffer[2] = '\0';
      buffer[۱] = '\۰';

      switch ( atoi( buffer ) ){                   // Select G command
      case ۰:                                   // G00 & G01 - Movement or fast movement. Same here
      case ۱:
        // /!\ Dirty - Suppose that X is before Y
        char* indexX = strchr( line+currentIndex, 'X' );  // Get X/Y position in the string (if any)
        char* indexY = strchr( line+currentIndex, 'Y' );
        if ( indexY <= ۰ ) {
          newPos.x = atof( indexX + ۱);
          newPos.y = actuatorPos.y;
        }
        else if ( indexX <= ۰ ) {
          newPos.y = atof( indexY + ۱);
          newPos.x = actuatorPos.x;
        }
        else {
          newPos.y = atof( indexY + ۱);
          indexY = '\۰';
          newPos.x = atof( indexX + ۱);
        }
        drawLine(newPos.x, newPos.y );
        //        Serial.println("ok");
        actuatorPos.x = newPos.x;
        actuatorPos.y = newPos.y;
        break;
      }
      break;
    case 'M':
      buffer[۰] = line[ currentIndex++ ];        // /!\ Dirty - Only works with 3 digit commands
      buffer[۱] = line[ currentIndex++ ];
      buffer[۲] = line[ currentIndex++ ];
      buffer[۳] = '\۰';
      switch ( atoi( buffer ) ){
      case ۳۰۰:
        {
          char* indexS = strchr( line+currentIndex, 'S' );
          float Spos = atof( indexS + ۱);
          //         Serial.println("ok");
          if (Spos == ۱۲۰) {
            penDown();
          }
          if (Spos == ۱۵) {
            penUp();
          }
          break;
        }
      case ۱۱۴:                                // M114 - Repport position
        Serial.print( "Absolute position : X = " );
        Serial.print( actuatorPos.x );
        Serial.print( "  -  Y = " );
        Serial.println( actuatorPos.y );
        break;
      default:
        Serial.print( "Command not recognized : M");
        Serial.println( buffer );
      }
    }
  }


}


/*********************************
 * Draw a line from (x0;y0) to (x1;y1).
 * Bresenham algo from https://www.marginallyclever.com/blog/2013/08/how-to-build-an-2-axis-arduino-cnc-gcode-interpreter/
 * int (x1;y1) : Starting coordinates
 * int (x2;y2) : Ending coordinates
 **********************************/
void drawLine(float x1, float y1) {

  if (verbose)
  {
    Serial.print("fx1, fy1: ");
    Serial.print(x1);
    Serial.print(",");
    Serial.print(y1);
    Serial.println("");
  }

  //  Bring instructions within limits
  if (x1 >= Xmax) {
    x1 = Xmax;
  }
  if (x1 <= Xmin) {
    x1 = Xmin;
  }
  if (y1 >= Ymax) {
    y1 = Ymax;
  }
  if (y1 <= Ymin) {
    y1 = Ymin;
  }

  if (verbose)
  {
    Serial.print("Xpos, Ypos: ");
    Serial.print(Xpos);
    Serial.print(",");
    Serial.print(Ypos);
    Serial.println("");
  }

  if (verbose)
  {
    Serial.print("x1, y1: ");
    Serial.print(x1);
    Serial.print(",");
    Serial.print(y1);
    Serial.println("");
  }

  //  Convert coordinates to steps
  x1 = (int)(x1*StepsPerMillimeterX);
  y1 = (int)(y1*StepsPerMillimeterY);
  float x0 = Xpos;
  float y0 = Ypos;

  //  Let's find out the change for the coordinates
  long dx = abs(x1-x0);
  long dy = abs(y1-y0);
  int sx = x0<x1 ? StepInc : -StepInc;
  int sy = y0<y1 ? StepInc : -StepInc;

  long i;
  long over = ۰;

  if (dx > dy) {
    for (i=۰; i<dx; ++i) {
      myStepperX.onestep(sx,MICROSTEP);
      over+=dy;
      if (over>=dx) {
        over-=dx;
        myStepperY.onestep(sy,MICROSTEP);
      }
    delay(StepDelay);
    }
  }
  else {
    for (i=۰; i<dy; ++i) {
      myStepperY.onestep(sy,MICROSTEP);
      over+=dx;
      if (over>=dy) {
        over-=dy;
        myStepperX.onestep(sx,MICROSTEP);
      }
      delay(StepDelay);
    }
  }

  if (verbose)
  {
    Serial.print("dx, dy:");
    Serial.print(dx);
    Serial.print(",");
    Serial.print(dy);
    Serial.println("");
  }

  if (verbose)
  {
    Serial.print("Going to (");
    Serial.print(x0);
    Serial.print(",");
    Serial.print(y0);
    Serial.println(")");
  }

  //  Delay before any next lines are submitted
  delay(LineDelay);
  //  Update the positions
  Xpos = x1;
  Ypos = y1;
}

//  Raises pen
void penUp() {
  penServo.write(penZUp);
  delay(penDelay);
  Zpos=Zmax;
  digitalWrite(۱۵, LOW);
    digitalWrite(۱۶, HIGH);
  if (verbose) {
    Serial.println("Pen up!");

  }
}
//  Lowers pen
void penDown() {
  penServo.write(penZDown);
  delay(penDelay);
  Zpos=Zmin;
  digitalWrite(۱۵, HIGH);
    digitalWrite(۱۶, LOW);
  if (verbose) {
    Serial.println("Pen down.");


  }
}
|
برچسب ها: آموزش ساخت رباط نویسنده , آموزش سی ان سی , پرینتر سه بعدی , رباط نقاش با سی دی رام , ساخت ربات نویسنده , ساخت رباط نقاش با سی دی رام , ساخت رباط نویسنده , ساخت نویسنده , ساخت نویسنده با سی دی رام , ساخت نویسنده با سی دی رام کهنه , سی ان سی , فیلامنت , کیت پرینتر سه بعدی , نویسنده با سی دی رام
بسیارعالی.
با سلام.
من هم قصد ساختن این نویسنده را دارم.ازشیلدl293dهم استفاده کردم ولی مدل اردینو من unoهستش.کدهای یاد یونو را میخواستم.وازچه نام افزاری هایی استفاده کنم.لطفا راهنمایی کنید.ممنون
سلام دوستان من آردوینو uno دارم و بلد نیستم ببندم و هم ببندم و هم نقشه الکترو نیک شو ببندم
تورو خدا یع کمکی بکنید
سلام
من هم قصد ساختن این ربات را دارم ، از تمام وسایل که گفته استفاده کردم ولی از آردوینو uno استفاده کردم . من نقشه مکانیکی رو بلد نیستم اگه میشه بزارید
ممنونم از سایت خوبتون
سلام
من هم قصد ساختن این ربات را دارم ، از تمام وسایل که گفته استفاده کردم ولی از آردوینو uno استفاده کردم . من نقشه مکانیکی رو بلد نیستم اگه میشه بزارید
ممنونم از سایت خوبتون.
سلام همه چی ok تو جی کد کردن موندم ۰۹۱۸۹۳۷۴۹۲۸ لطفا کمک کنید
سلام من برای نصب استوپر متورها به نقشه که نگاه میکنم ترنیب سیمها از راست به چپ سیاه . سبز . ابی . قرمز هستش ولی سیمهای استپر موتورهای که به من دادین رنگهاشون فرق میکنه
قهوه ای سبز ابی زرد اگه ممکنه ترتیب سیمها رو بهم بگین
سیم سیاه وقرمز روی استپ موتور کدوم سیم هستش